
Sunday, April 27, 2008
New Shop! New Sign! New Rate!
Tim McCready Fine Furniture & Architectural Woodworking has officially been subsumed by Bankston & Bailey LLC. All future business will be conducted under the latter name. We're moving into a new space in Richmond's Scott's Addition on May 1 (more details forthcoming), and our new shop rate is $50/hr. Check out Hunter Duke's drawing of our new sign:


Drawn But Not Yet Built
Here are a couple of sketches I made recently for a prospective job. My plan on this piece would be to use a milkpaint and linseed oil finish. The diamond grid in the doors would be a custom-fabricated brass grille with pleated linen hanging behind that. As drawn, the piece is a full six feet wide. I would probably use casement stays on the doors so they would be well supported in the open position.


Thursday, April 17, 2008
Lock Lane Cases Complete!
I put the finishing touches on the built-ins on Lock Lane this afternoon, installing knobs and touching up a few paint spots. This was a very enjoyable project from the design phase straight through to hanging doors. Having a great client who really appreciates one's work is always a pleasure!
I hope to have a more professional photo of the complete project to post sometime in the next month or so.
In the meantime, if you happen to own one of the Lock Lane condos with this particular floor plan, I saved all my drawings and templates...


I hope to have a more professional photo of the complete project to post sometime in the next month or so.
In the meantime, if you happen to own one of the Lock Lane condos with this particular floor plan, I saved all my drawings and templates...


Thursday, April 10, 2008
Installation Finis! Painting Starts Tomorrow.
Here is a roughly patched-together shot of the completed woodworking over on Lock Lane. Tomorrow I'll do last-minute finish prep, then prime everything. I'll mortise the door hinges and start making the shelves tomorrow as well. I expect I'll wrap up by Tuesday or Wednesday.


Tuesday, April 08, 2008
Installation Day 2
Today was my second full day installing the pair of bookcases I've been working on for one of the new Lock Lane condos. The great electrician Don Brewster met me first thing this morning to take care of rewiring the electrical and cable outlets in the cases. In the early evening I got started on the trim for the larger of the two pieces--I'll finish up installing moldings and hanging doors tomorrow and the next day.


Wednesday, April 02, 2008
Arches, Neck Moulding, and Keystones
Today I missed the U.S. Concepts arch moulder we had at the place I worked before going out on my own. With that machine I could have churned out the radius casings for the arches on this project in a matter of minutes. As it was, I built them up from three separate elements which are being glued together in the shot below. You can get a sense of the nice morning light in the shop from this photo.

I was curious to see how the mouldings would work together in the real world--I'd seen them in my drawings--so I used some double-sided tape to hold things in place in order to have a look. To my eye, the way the radius moulding wraps around and forms the neck moulding on the pilaster seems ever-so-slightly odd, but the research I've done confirms that this is the way to go. I don't remember it looking strange in person, and I kind of think I'm seeing it that way now because there is such low contrast in this photo between the pilaster's capital and the wood behind it.

I also made the keystones this afternoon. The photo below shows one taped together--sometimes I like to do that before committing myself with glue and clamps. I'd been through several designs of the keystone, and finally found some very helpful guidance in Asher Benjamin's 1830 volume The Architect, Or Practical House Carpenter. Benjamin suggests that blocks of this design be divided into 9 parts, with the center section representing 5 units to 2 units for each of the outer sections.

Dover Publications prints a nice paperback edition of Benjamin's book (ISBN:0486258025) which is available for around $10 at just about any online book seller.

I was curious to see how the mouldings would work together in the real world--I'd seen them in my drawings--so I used some double-sided tape to hold things in place in order to have a look. To my eye, the way the radius moulding wraps around and forms the neck moulding on the pilaster seems ever-so-slightly odd, but the research I've done confirms that this is the way to go. I don't remember it looking strange in person, and I kind of think I'm seeing it that way now because there is such low contrast in this photo between the pilaster's capital and the wood behind it.

I also made the keystones this afternoon. The photo below shows one taped together--sometimes I like to do that before committing myself with glue and clamps. I'd been through several designs of the keystone, and finally found some very helpful guidance in Asher Benjamin's 1830 volume The Architect, Or Practical House Carpenter. Benjamin suggests that blocks of this design be divided into 9 parts, with the center section representing 5 units to 2 units for each of the outer sections.

Dover Publications prints a nice paperback edition of Benjamin's book (ISBN:0486258025) which is available for around $10 at just about any online book seller.
Monday, March 31, 2008
Progress!
The pair of colonial built-in bookcases is coming along nicely. I made the raised panel doors today, and tomorrow I'll get started on the moldings for the arches. I'm hoping to begin installing the cases on Friday.
Below you'll see a drawing of the right-hand case and then the case in its current state.


Below you'll see a drawing of the right-hand case and then the case in its current state.


Tuesday, March 18, 2008
Next Up: Locke Lane Cases
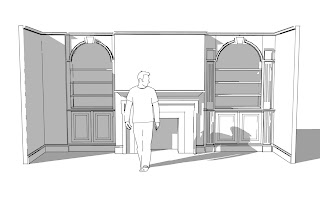
I'm starting full-steam ahead on a pair of painted colonial built-in cabinets with arches, keystones, fluted pilasters, and raised panel doors. I owe a lot to Wendell Garrett's fantastic book American Colonial (ISBN: 1885254997) for design inspiration. Cases of this kind typically had scalloped shelves and were used for the display of porcelain and other valuables. I've adapted that form for the storage and display of books. I particularly like the keystones in this design, which are modeled on one at the Morris-Jumel mansion in Manhattan. To my eye, it almost hints at art deco.


Monday, March 10, 2008
Ginter Park Bookcases Pt. 4
The upper cases and face frames went in today. Tomorrow I'll install the bed molding, which in this room functions as a small crown. Then I'll start painting.

Check out how cattywompass the ceiling is to the left of the chimney. It dips about 1/2" over a 10" span. The good news is that the bed molding is positioned below the ceiling just enough to make the dip disappear. That's a piece of good luck.


Check out how cattywompass the ceiling is to the left of the chimney. It dips about 1/2" over a 10" span. The good news is that the bed molding is positioned below the ceiling just enough to make the dip disappear. That's a piece of good luck.

Saturday, March 08, 2008
Breakfront Base Complete!
Yesterday afternoon I finished the chinese chippendale breakfront base I've been working on. If you've not been following these posts, please note that I'm not responsible for the upper section of this piece; I only made the base to match.

Finishing took the better part of last week. After prep was complete, I used a water-based aniline dye to match the background color of the existing piece. A thin wash coat of shellac followed, and then grain filler tinted with japan color. After the next coat of shellac, I applied walnut crystals and a different aniline dye to approximate the color variations in the upper piece. Once this was done to my satisfaction, a few more coats of shellac were brushed on. Finally, I rubbed-out with steel wool, then waxed and buffed.
Thanks to Alan and Harold for their extensive help with this finish!

The client hasn't chosen hardware yet, if you're wondering how one opens the doors and drawers.

Finishing took the better part of last week. After prep was complete, I used a water-based aniline dye to match the background color of the existing piece. A thin wash coat of shellac followed, and then grain filler tinted with japan color. After the next coat of shellac, I applied walnut crystals and a different aniline dye to approximate the color variations in the upper piece. Once this was done to my satisfaction, a few more coats of shellac were brushed on. Finally, I rubbed-out with steel wool, then waxed and buffed.
Thanks to Alan and Harold for their extensive help with this finish!

The client hasn't chosen hardware yet, if you're wondering how one opens the doors and drawers.
Thursday, February 28, 2008
Fret Moldings Installed
I spent the day installing the fret moldings on the breakfront base I've been working on. This was incredibly tedious work, but I'm not complaining; as any of my friends will tell you, tedium is my middle name! These were some tricky miters because no 45 degree angles were involved. The larger doors required 52/38 degree cuts, while the smaller doors were some other combination summing to 90. I used a brad pusher and tiny brads to hold each piece in place until the glue set. Altogether, making and installing these little moldings took about 12 hours. Sheesh.
Tomorrow I'll fit the drawers, hang the doors, and do finish prep.


Tomorrow I'll fit the drawers, hang the doors, and do finish prep.


Tuesday, February 26, 2008
Breakfront Progress!
Today I made the doors and drawer faces for the breakfront base I've been working on. Tomorrow I'll make and install the fretwork moldings you see in the drawing below.


Saturday, February 23, 2008
Locke Lane Condominiums
I'm in the early design phase of a project at the old Locke Lane apartments on Grove Avenue. The apartments have been renovated into beautiful, high-end condos, and one of the new owners commissioned a pair of built-in bookcases for his living room. I'm getting to the point where I'm happy with the basic proportions of the case work, but am fussing a lot about details, like whether or not the heads should be arched. Here's where the sketch stands at present.


Chinese Chippendale Breakfront
I've recently been working on the base for a Chinese Chippendale breakfront. The client has the upper case and needs a base to match. Below are some photos of the work in progress as well as examples of the kinds of measured drawings I use in the shop.


Friday, February 22, 2008
KENTWOOD MOLDER: BEWARE
The following is a post I made to the Woodweb.com site on February 13, 2008. The forum's moderator contacted me a few hours after I posted to inform me that she had pulled the post for failure to adhere to Woodweb's posting guidelines. Because they cannot independently verify complaints of this kind, they do not allow them on the site. Nonetheless, I feel it is imperative that information of this kind be available to prospective buyers of any machine that poses such serious health threats in the event of a malfunction. I am confident that if my former employers had access to information of this kind, they would have purchased a different molder.
Despite my criticisms, I want to emphasize that I perceive Stiles Machinery, which markets the Kentwood Molder, to be an excellent company in general. I have written very favorably about them in previous posts, and as a woodworker, I have enjoyed the use of many of the machines they sell and service. While negative perceptions like those I share in the post below may decrease the likelihood that those in the market for a molder choose a Kentwood, nothing I say could affect Stiles as adversely as a serious injury resulting from a machine of unacceptably low quality.
Lastly, if anyone reading this would like to respond to any aspect of this post, I will gladly publish any reasonable comments.
Here is the original post from Woodweb:
I had previously posted anonymously about Kentwood Molders, advising prospective buyers to contact me first. At the time, I was concerned about adversely affecting my employer's relationship with Stiles. At this point, my misgivings about the machine far outweigh that consideration.
The molder has been nothing but trouble. Spindles have spun out of their housings. Heads have locked onto spindles. Belts have disintegrated while scarcely under load. Latches and other small parts have failed, at times leaving the machine inoperable. Yesterday, the guard on #3 vibrated loose, made contact with the spinning head, shattered, and sent shrapnel flying throughout the machine. One piece of shrapnel actually pierced the acrylic hood.
I cannot overstate my misgivings about this machine. In my view, it should be taken off the market. Please feel free to contact me with any questions.
Be safe.
Despite my criticisms, I want to emphasize that I perceive Stiles Machinery, which markets the Kentwood Molder, to be an excellent company in general. I have written very favorably about them in previous posts, and as a woodworker, I have enjoyed the use of many of the machines they sell and service. While negative perceptions like those I share in the post below may decrease the likelihood that those in the market for a molder choose a Kentwood, nothing I say could affect Stiles as adversely as a serious injury resulting from a machine of unacceptably low quality.
Lastly, if anyone reading this would like to respond to any aspect of this post, I will gladly publish any reasonable comments.
Here is the original post from Woodweb:
I had previously posted anonymously about Kentwood Molders, advising prospective buyers to contact me first. At the time, I was concerned about adversely affecting my employer's relationship with Stiles. At this point, my misgivings about the machine far outweigh that consideration.
The molder has been nothing but trouble. Spindles have spun out of their housings. Heads have locked onto spindles. Belts have disintegrated while scarcely under load. Latches and other small parts have failed, at times leaving the machine inoperable. Yesterday, the guard on #3 vibrated loose, made contact with the spinning head, shattered, and sent shrapnel flying throughout the machine. One piece of shrapnel actually pierced the acrylic hood.
I cannot overstate my misgivings about this machine. In my view, it should be taken off the market. Please feel free to contact me with any questions.
Be safe.
Flat Files Finished!
On my last two days working for one of Richmond's oldest suppliers of building materials, I installed a set of flat file drawers in the drafting room. Eventually, the top will be painted a deep, semi-gloss red while the sides and plinth will be some neutral color to match the room's trim. The six drawers are roughly 5" tall x 46" wide x 40" deep, i.e., truly huge. Each pair of full--extension drawer slides weighs about 20 pounds and cost somewhere in the $100 range. The exquisite mahogany I used for this project was in a shed behind the mill where I worked.

The shot below shows the cockbead I applied to the drawers' perimeters. I should mention that I used clear white pine as a secondary wood and that the finish is boiled linseed oil, shellac, and wax.

This last photo details the brass and mahogany knobs I used on the case. Lee Valley sells beautifully turned brass knobs which are recessed to accept any 3/4" diameter material. I chose to use mahogany to match the drawer faces. I thought the piece ended up with a bit of a nautical flair, thanks to this combination of brass and mahogany.

This was a fun project. If you're reading this and in the market for a chest of flat file drawers, contact please email me at timmccready@mac.com for an estimate.

The shot below shows the cockbead I applied to the drawers' perimeters. I should mention that I used clear white pine as a secondary wood and that the finish is boiled linseed oil, shellac, and wax.

This last photo details the brass and mahogany knobs I used on the case. Lee Valley sells beautifully turned brass knobs which are recessed to accept any 3/4" diameter material. I chose to use mahogany to match the drawer faces. I thought the piece ended up with a bit of a nautical flair, thanks to this combination of brass and mahogany.

This was a fun project. If you're reading this and in the market for a chest of flat file drawers, contact please email me at timmccready@mac.com for an estimate.
Thursday, January 31, 2008
Ginter Park Bookcases Pt. 3
The next step on this project was to establish a level base on the left-hand side of the fireplace onto which the case could be fastened. My main concern was that the line describing the top of the lowest shelf read as level from the old to the new case. This line is highlighted in red on the right-hand case below; it is 4.25" from the floor.

To transfer a line from the right-hand side of the room, around the fireplace, and over to the left-hand side, I used a laser level. I set it up in the room on a base which I leveled front-to-back and side-to-side with shims. I directed the laser to the top of the lowest shelf on the existing case, making sure that the laser sat perfectly level as I did so. The point at which I was aiming was the same one highlighted in red in the photo above.

Next, I pivoted the laser until it was directed to my target point on the left-hand side of the fireplace. I had made a base about 1/2" shorter than I would need and used shims at its four corners to raise it to its final height. That height is represented by the line onto which the laser beam is shining in the above photo. Once this height was correct all the way across the front of the base, I leveled the front-to-back dimension with shims and a regular spirit level.

The photo above shows the almost-complete base. At this point, two steps remained. The first was attaching permanent feet which would hold the base in its final, level position.

The last step was establishing a plumb line from the new mantel shelf above to the floor below. Once I had the base positioned relative to this plumb line right where I wanted it, I attached it to the floor with screws. At this point I could be sure that when I plopped the case onto its base, it would sit in the proper relation to the existing case on the right-hand side, with all the shelves reading as level with one another all the way across.

Here's the installed case. With minimal fuss it slid onto its permanent base just as I'd hoped it would. Next week, I'll trim the case to match the existing one, and I'll get started on the upper cases with their adjustable shelves.

To transfer a line from the right-hand side of the room, around the fireplace, and over to the left-hand side, I used a laser level. I set it up in the room on a base which I leveled front-to-back and side-to-side with shims. I directed the laser to the top of the lowest shelf on the existing case, making sure that the laser sat perfectly level as I did so. The point at which I was aiming was the same one highlighted in red in the photo above.

Next, I pivoted the laser until it was directed to my target point on the left-hand side of the fireplace. I had made a base about 1/2" shorter than I would need and used shims at its four corners to raise it to its final height. That height is represented by the line onto which the laser beam is shining in the above photo. Once this height was correct all the way across the front of the base, I leveled the front-to-back dimension with shims and a regular spirit level.

The photo above shows the almost-complete base. At this point, two steps remained. The first was attaching permanent feet which would hold the base in its final, level position.

The last step was establishing a plumb line from the new mantel shelf above to the floor below. Once I had the base positioned relative to this plumb line right where I wanted it, I attached it to the floor with screws. At this point I could be sure that when I plopped the case onto its base, it would sit in the proper relation to the existing case on the right-hand side, with all the shelves reading as level with one another all the way across.

Here's the installed case. With minimal fuss it slid onto its permanent base just as I'd hoped it would. Next week, I'll trim the case to match the existing one, and I'll get started on the upper cases with their adjustable shelves.
Monday, January 21, 2008
Ginter Park Bookcases Pt. 2
Here's a picture of the right-hand side of the wall where I'm installing the built-in bookcases. I will be matching the existing cases you see in this photo over on the left-hand side of the fireplace. Once that's done, I'll build cases that go from the existing mantle-shelf level up to the ceiling on both sides.

In my last post about this project, I described the method I use to create a 3D "map" of the spaces I'm working with. Below, you can see how I use the computer model to derive templates for workpieces that have to fit into odd areas. I'll be extending the mantel shelf you see in the photo above over to the left-hand wall. Since the left-hand corner is about 5 degrees from square and slightly curved, it took some careful templating to make a piece that would fit just right.

This last photo shows the piece which will form the top of the new mantle shelf. If you viewed this piece from the top, you'd see that its ends are far from square and parallel. When something like this is fit properly, though, one doesn't see how wonky it really is.


In my last post about this project, I described the method I use to create a 3D "map" of the spaces I'm working with. Below, you can see how I use the computer model to derive templates for workpieces that have to fit into odd areas. I'll be extending the mantel shelf you see in the photo above over to the left-hand wall. Since the left-hand corner is about 5 degrees from square and slightly curved, it took some careful templating to make a piece that would fit just right.

This last photo shows the piece which will form the top of the new mantle shelf. If you viewed this piece from the top, you'd see that its ends are far from square and parallel. When something like this is fit properly, though, one doesn't see how wonky it really is.

Wednesday, January 16, 2008
Ginter Park Bookcases Pt. 1
I recently began work on a set of built-in bookcases for a home on Ginter Park's lovely Wilmington Avenue. I plan to track the project's progress here on the blog as I make my way through it. Though specific details vary from job to job, most projects go through a series of similar phases. With built-ins like these, my first step is always to make a very detailed three-dimensional map of the room.
The map of the room which will house the bookcases is pictured below. I generated it using 3D drafting software and my extensive field notes. Initial measuring of the space took about an hour, and making the drawing was another few hours-worth of work. It's very important to me that I get this map just right. Because of settling, old houses like this one rarely have plumb or square walls. The various kooky angles that result directly affect the dimensions of the cases as I'll detail in a later post. My concern at this point is that all those angles and dimensions are accurately represented in the model.

As you can see in the model, the house already has a case on the lower right-hand side of the fireplace. It's a mystery to me why the left-hand side did not also have shelves. When I'm finished, cases will go from floor to ceiling on both sides.
The map of the room which will house the bookcases is pictured below. I generated it using 3D drafting software and my extensive field notes. Initial measuring of the space took about an hour, and making the drawing was another few hours-worth of work. It's very important to me that I get this map just right. Because of settling, old houses like this one rarely have plumb or square walls. The various kooky angles that result directly affect the dimensions of the cases as I'll detail in a later post. My concern at this point is that all those angles and dimensions are accurately represented in the model.

As you can see in the model, the house already has a case on the lower right-hand side of the fireplace. It's a mystery to me why the left-hand side did not also have shelves. When I'm finished, cases will go from floor to ceiling on both sides.
Sunday, January 13, 2008
Walnut Tea Caddy
Here are a few shots of the walnut tea caddy I just finished. I made the bookmatched veneers on the top with my new bandsaw. This one is a gift for a dear friend.


Subscribe to:
Posts (Atom)