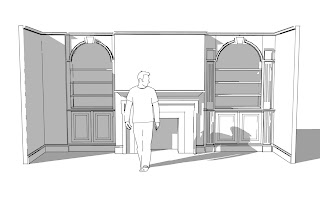
The pair of colonial built-in bookcases is coming along nicely. I made the raised panel doors today, and tomorrow I'll get started on the moldings for the arches. I'm hoping to begin installing the cases on Friday.
Below you'll see a drawing of the right-hand case and then the case in its current state.
Monday, March 31, 2008
Tuesday, March 18, 2008
Next Up: Locke Lane Cases
I'm starting full-steam ahead on a pair of painted colonial built-in cabinets with arches, keystones, fluted pilasters, and raised panel doors. I owe a lot to Wendell Garrett's fantastic book American Colonial (ISBN: 1885254997) for design inspiration. Cases of this kind typically had scalloped shelves and were used for the display of porcelain and other valuables. I've adapted that form for the storage and display of books. I particularly like the keystones in this design, which are modeled on one at the Morris-Jumel mansion in Manhattan. To my eye, it almost hints at art deco.
Monday, March 10, 2008
Ginter Park Bookcases Pt. 4
The upper cases and face frames went in today. Tomorrow I'll install the bed molding, which in this room functions as a small crown. Then I'll start painting.
Check out how cattywompass the ceiling is to the left of the chimney. It dips about 1/2" over a 10" span. The good news is that the bed molding is positioned below the ceiling just enough to make the dip disappear. That's a piece of good luck.
Saturday, March 08, 2008
Breakfront Base Complete!
Yesterday afternoon I finished the chinese chippendale breakfront base I've been working on. If you've not been following these posts, please note that I'm not responsible for the upper section of this piece; I only made the base to match.
Finishing took the better part of last week. After prep was complete, I used a water-based aniline dye to match the background color of the existing piece. A thin wash coat of shellac followed, and then grain filler tinted with japan color. After the next coat of shellac, I applied walnut crystals and a different aniline dye to approximate the color variations in the upper piece. Once this was done to my satisfaction, a few more coats of shellac were brushed on. Finally, I rubbed-out with steel wool, then waxed and buffed.
Thanks to Alan and Harold for their extensive help with this finish!
The client hasn't chosen hardware yet, if you're wondering how one opens the doors and drawers.
Subscribe to:
Posts (Atom)