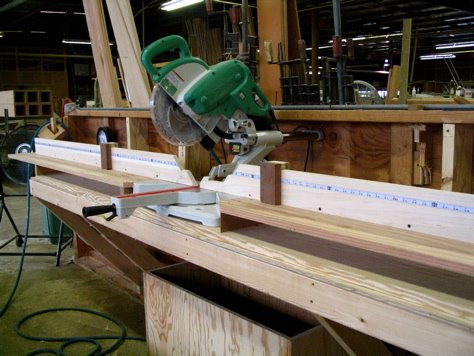
 Here's the finished set up in all its glory. There are several problems with normal chop saw arrangements that I wanted to correct. The first was drooping table extensions. I hate it when you have to apply significant downward pressure on your workpiece to keep it square. The second problem was always having to use a measuring tape and pencil every time you want to make an accurate cut. The third problem was coming up with a stop system that was versatile and did not require any clamps. More below.
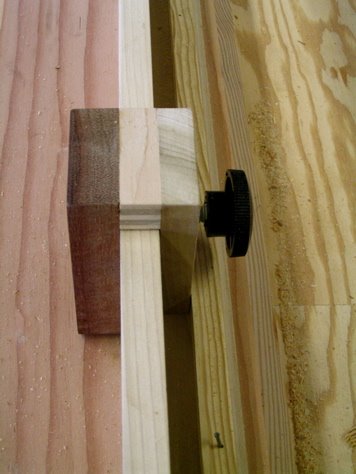
Here's the stop I came up with. It slides along the fences and clamps with a threaded knob along the back. I was naive in thinking that the threaded bolt would hold the thing square; all it did was spread the bottom of the front side of the stop away from the fence. That's why you see a nailed-on pine strip underneath the knob. It keeps the bolt's pressure correctly oriented.

Each side of the fence has its own stop, and each stop has two square sides. One side of each is relieved to allow dust, while the other is left straight all the way to the table. This way, if I'm ever crosscutting veneer or other really thin stock, I can use the straight side.
I attached tapes to 1/4" thick strips of poplar and fit them into dadoes I routed into the fences. This way, I can set the edge of the stops at any dimension along the fence and cut accurately. No need to measure! I found left-reading and right-reading metal, adhesive-backed tapes at Woodcraft.
Another thing you can see in this picture is part of the system I used for leveling the tables. Both tables are attached to two cherry strips like you see below. The strips have threaded inserts about halfway down their lengths that accept a bolt through the middle of the tabletop. A few inches on either side of that bolt, the top has threaded inserts with set screws in them. Leaving the middle bolt loose, I adjusted the set screws using a laser level on the tables until they were perfectly level from far left, across the saw, out to far right. That took a lot of work. Once it was done, I socked down the bolts in the center. If the table sags in the future (which it probably will), I'll just adjust again.

I figured that I'd never get the tapes perfect if I stuck them directly onto the fences. That's why I went with the inlaid strips. To allow me to perfectly index the tapes, I used the system of elongated holes above. It took a bit of fiddling, but the tapes and stops now work together well enough that I can cut any length accurately to within 1/64th.
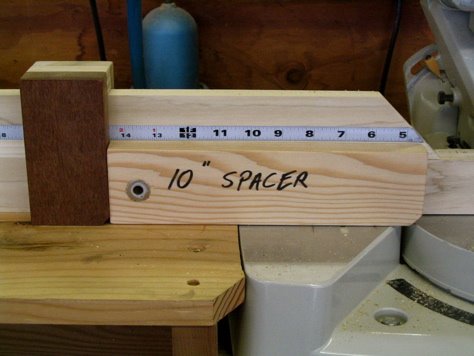
Because of the saw's built-in fences, the stops can't reach past 10" from the cut. So I came up with the spacer block you see above. If I have to cut something that's 2 1/4", I set the stop at 12 1/4", and add the spacer. I've found other uses for it, too. For instance, let's say I want to accurately cut 1/16" from the ends of a bunch of boards that aren't starting out at the same length. What I do is set up the stop and the spacer to the left of the cut so that the spacer is 1/16" shy of the right side of the kerf. I then butt my workpiece against the spacer, remove the spacer, and cut.

Here's a head-first shot. You can see where I wasted away the fences to allow for all possible compound bevels.
1 comment:
Wood Mechanic, you are an astonishment. Your work is absolutely beautiful and glows with love. My favorites are the malachite chest and your writing desk. I love that desk.
Post a Comment